Top Futsal Formations – Essential Tactics in 5-a-Side
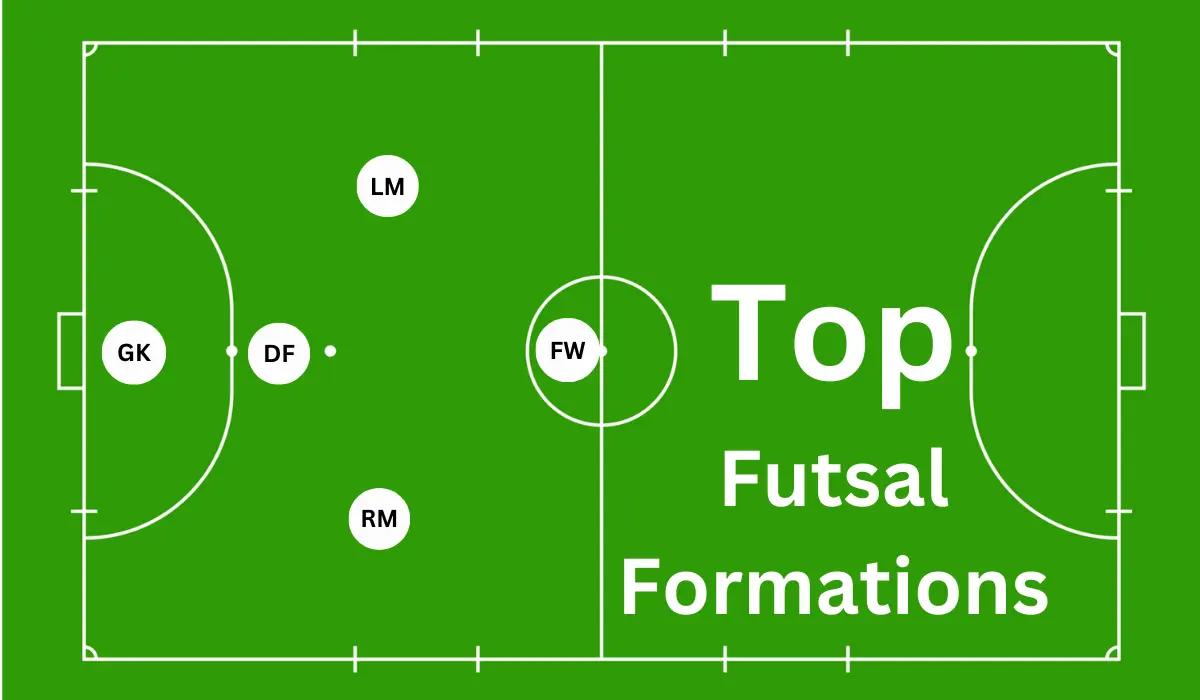
Did you know that futsal players touch the ball up to 600% more than outdoor soccer players during a match? This high-intensity, small-sided game isn’t just about quick feet and fancy footwork – it’s a chess match played at lightning speed.
Welcome to the world of futsal formations, where every move counts and split-second decisions can make or break a game.
Picture this: You’re on a compact indoor court, heart racing, with just four teammates by your side. The opposition is breathing down your neck, and the clock is ticking. This is where the right formation becomes your secret weapon.
Futsal isn’t just a scaled-down version of soccer – it’s a unique beast that demands its own tactical approach. With limited space and fewer players, your formation choice can be the difference between dominating the court and being left in the dust.
From the classic 1-2-1 diamond that offers perfect balance, to the aggressive 1-1-2 ‘Y’ that keeps opponents on their toes, each formation has its own personality. But here’s the kicker – the best teams don’t just stick to one. They morph and adapt on the fly, keeping their opponents guessing.
Did you know that the Brazilian futsal team, five-time world champions, is famous for their fluid 4-0 system? This formation allows for constant rotation, creating a dizzying spectacle that’s as beautiful as it is effective.
But formations aren’t just Xs and Os on a clipboard. They’re living, breathing entities that require:
- Razor-sharp communication
- Iron-clad discipline
- A deep understanding of each player’s role
- The ability to switch gears in the blink of an eye
And let’s not forget the importance of the right gear. Those specialized futsal shoes aren’t just for show – they’re engineered for the lightning-quick cuts and precise ball control that can make or break your tactical setup.
Ready to dive into the fascinating world of futsal formations? This guide will break down the most popular setups, dissecting their strengths and weaknesses. You’ll learn how to:
- Choose the perfect formation for your team’s unique skills
- Master the intricate movement patterns that bring formations to life
- Adapt your tactics on the fly to counter any opponent
Whether you’re a coach looking to elevate your team’s game or a player aiming to understand your role better, you’re in the right place. Get ready to transform your futsal strategy and leave your opponents wondering what hit them.
Let’s kick off this tactical journey and unlock the secrets of futsal formations!
Basics of Futsal Formation
When selecting a futsal formation with four outfield players, there are some core principles to keep in mind.
Firstly, have at least one dedicated defender to provide security at the back. Their role is to manage the defense and support the back line. Also, ensure there is an attacking outlet – one offensive player who can hold up the ball and relieve pressure on defense.
Maintaining a balance between defense and attack is also vital. The formation should provide a good mix of defensive stability to frustrate opponents, along with attacking potency to pose a threat going forward.
Pick a shape that caters to your player’s strengths and attack on the weaknesses of the opponent’s team. Be adaptive – be prepared to change the formation during a game based on the situation and opposition. Futsal formations require fluidity and players interchanging positions.
Keep things simple rather than overcomplicating shapes. With the right formation and preparation, a futsal team can excel. But shape alone isn’t enough – the system needs reinforcing through communication, discipline, and practice.
Top Futsal Formations Mostly Applied
When it comes to futsal formations, some common shapes see frequent use at all levels due to their inherent strengths. The versatile 1-2-1 diamond provides a balance between defense and attack with its mix of one defender, two central midfielders, and one striker.
The rigid 2-0-2 box splits players clearly into defensive and attacking pairs, though it can isolate the units. For more defensive solidity, the 2-1-1 pyramid uses two deep defenders with a midfielder who can drop back, absorbing pressure before counterattacking.
The risky 1-1-2 Y formation overloads the attack with two strikers and a supporting midfielder, applying constant offensive pressure. To frustrate opponents, the ultra-defensive 3-1 sees three dedicated defenders congest space and limit attacking threats from the opposition.
The fluid 4-0 system has no fixed positions, just four rotating players interchanging positions seamlessly to unsettle defenses. The 3-2 flying keeper formation is a highly attacking ploy, involving the keeper overloading midfield temporarily to create an extra man and this is used when the team is a goal down and match time is about to end.
While no one shape is universally “best”, awareness of these common, well-balanced futsal systems provides a framework to start implementing suitable tactics for your own team’s strengths and gradually improve your nation’s futsal world rankings.
Diamond Formation (1-2-1)
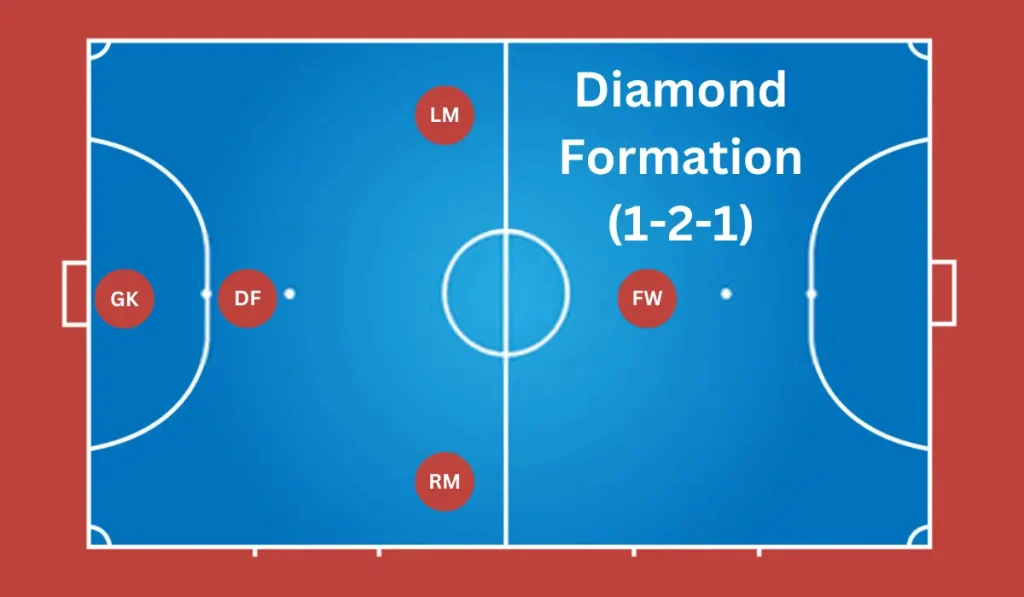
The versatile 1-2-1 diamond is one of the most popular and balanced futsal systems. Its strength lies in providing clear structure and responsibilities. The lone forward spearheads the attack, while the Fixo(Defender) anchors the defense.
The two central midfielders (Ala’s) or “wingers” support both ends as needed – aiding either the defense or attack at any moment. When executed properly, the diamond is hard to defend against, with slick rotations and midfield runners difficult to mark due to interchanging positions.
However, it relies on the wingers being disciplined and fit enough to contribute both offensively and defensively. They must perform their defensive duties. The formation can become imbalanced if one winger pushes too far forward and leaves a save to be exploited.
But overall, the diamond offers a great blend of defensive stability and attacking potency. Its balance and flexibility make it a solid choice for a futsal team. The diamond matches up well against square formations in particular.
For these reasons, it remains one of the widely used and reliable futsal formations.
Box Formation (2-0-2)
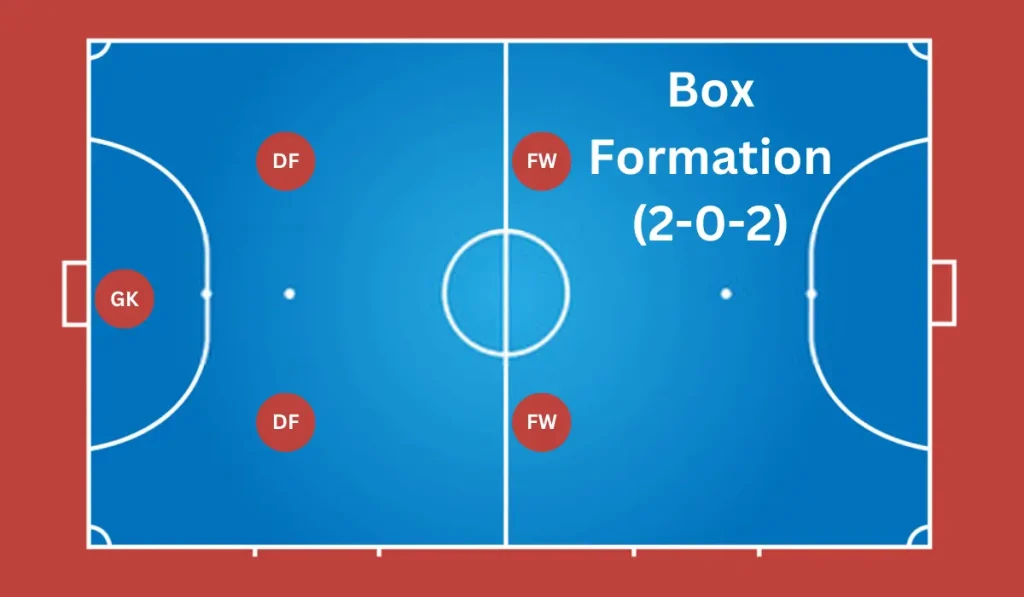
The rigid 2-0-2 box formation splits players clearly into defensive and attacking pairs. Its simplicity makes it easy to grasp but can also isolate the units. The clear line of two defenders sitting back and two attackers pushing forward establishes defined defensive and offensive zones.
This can help teams still learn the basics of positioning. The split pairs also provide width in both halves of the pitch. However, gaps can open up if the defenders go forward and the attackers neglect to track back. This formation is basically for beginners.
The formation is especially vulnerable in the transition phase between attack and defense. The isolated offensive pairing can become stranded if the forwards don’t close down space. But used correctly, the straightforward nature of the 2-0-2 box can diffuse the attack from opponents.
Its clear zones allow teams to play in a compact shape that covers the key central areas of the pitch. Be alert to the formation’s inherent isolation and gaps without proper defensive coordination between the units.
Coordination and communication are the most important things that need to be there on the pitch all the time to make yourself prepare against the opposition attack and prepare swiftly for the offensive move.
Pyramid System (2-1-1)
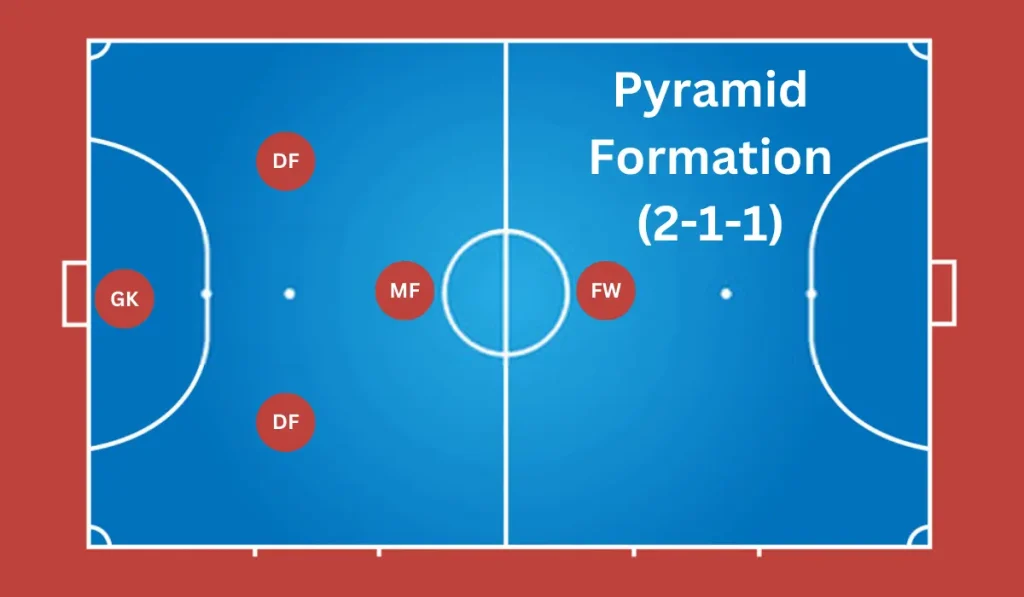
With its two deep-lying defenders and defensive midfield anchor, the 2-1-1 pyramid is inherently set up to absorb pressure before launching quick counterattacks. The dedicated holding midfielders and central defenders provide defensive protection and an organized structure.
Their deep positioning suits soaking up pressure before hitting opponents on the break with swift strikers running onto through balls. However, the isolated striker can become disconnected if the midfield pivot fails to link play effectively between the thirds so communicate accordingly.
The lack of true wingers also limits attacking width. Fluency in the final third can suffer without players stretching the back line. But against teams with dangerous attacking threats, the pyramid offers protection through its defensive shape and simple, defined roles – defenders sit deep, midfielder anchors, striker stays advanced.
For sides seeking more safety at the back, or with rapid and physically strong forwards who can profit from long balls, the pyramid is an ideal defensive-minded system that forces opponents to break down their offensive moves and turn them into a counterattack.
This formation is used against tough teams having top-notch offensive capabilities or if in a futsal tournament, your team needs to keep the game equal and still they would be in the next round then teams follow this formation. The chances of losing the games are minimized.
Y Formation (1-1-2)
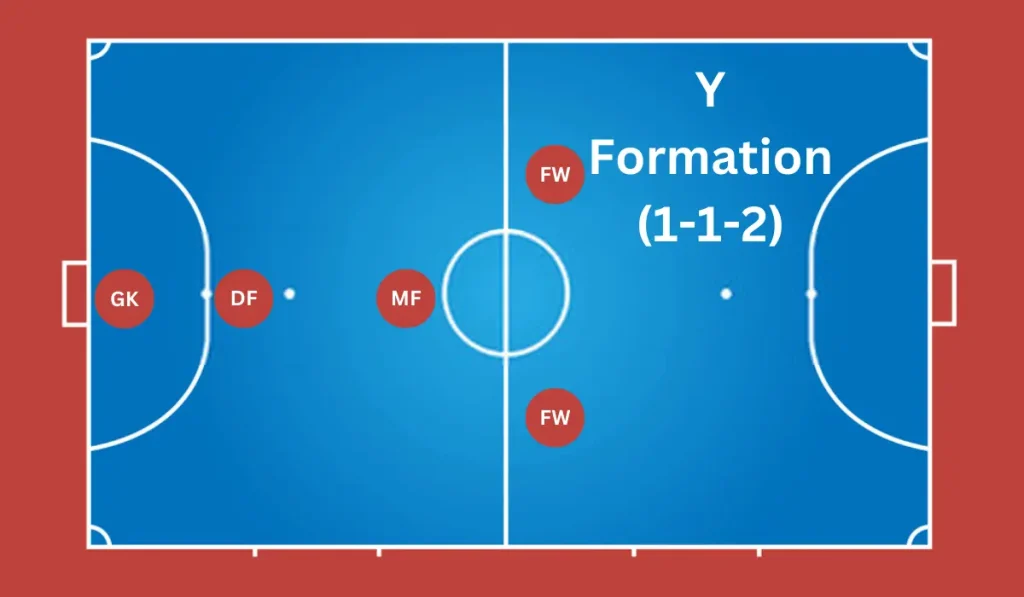
The adventurous 1-1-2 Y formation heavily overloads the attack with its shape comprising just one defender, one midfielder, and two forwards. This extremely offensive setup relentlessly pins back opponents through sheer attacking pressure.
The constant runs between the two strikers and supporting midfielder can overwhelm defenses. However, the lone defender leaves the team highly exposed at the back. Maintaining this aggressive shape demands supreme fitness of your defender especially to keep closing down counters.
The midfield runner must resist being caught field. But executed correctly, the Y’s lively, attacking style produces free-flowing, high-scoring contests. The formation suits risk-taking teams confident in their finishing against weaker opponents.
Deployed strategically when needing goals, rather than every match, it provides an element of surprise. The Y formation blurs the line between full attack and suicidal recklessness. Yet with the right and smart application, its offensive shape can grab vital goals when required.
This formation is used when your team needs to win the match at any cost otherwise you’ll be disqualified from the tournament of the futsal league then you go all out without thinking of a disaster because you’re already out of the tournament if you even equal the game.
Wall Formation (3-1)
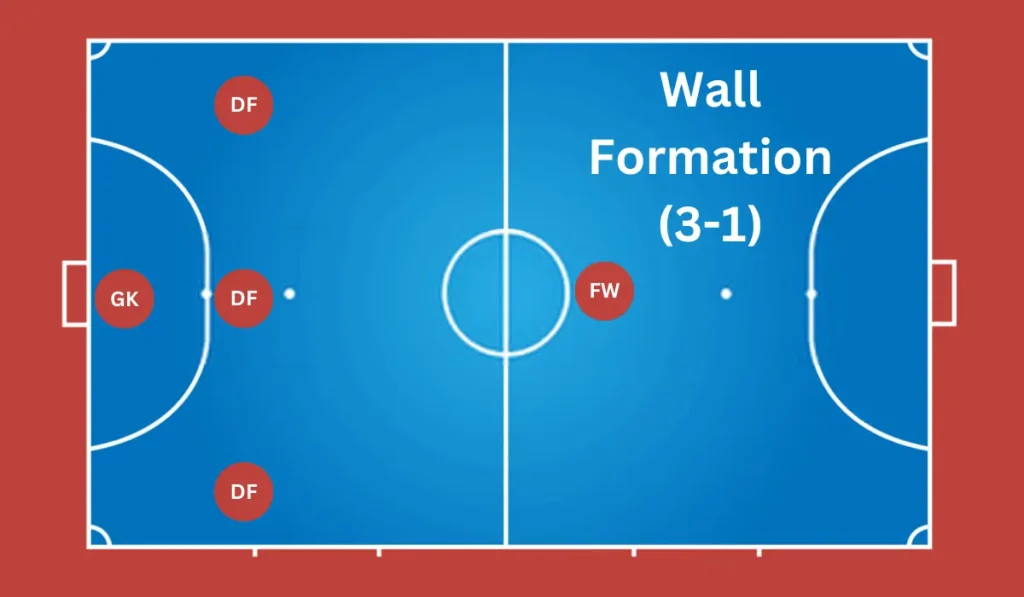
The ultra-defensive 3-1 formation aims to frustrate opponents and congest space with its heavy emphasis on defenders. With 3 dedicated players sitting deep and just 1 advanced striker, who’ll just make his effort on the counterattack. Extremely difficult for the striker to penetrate.
The deep-lying backline provides security, ideal for seeing out games with a lead intact. Opponents are forced wide into less dangerous areas and face a sea of defenders at every turn. However, the isolated striker has a demanding physical role covering the ground alone upfront.
The 3-1 also lacks an attacking threat with minimal support going forward. It’s a very negative system reliant on rigid shape at the back rather than flair. But for teams looking to hold onto a precarious advantage or to capitalize on the counter.
The steel curtain provided by three dedicated defenders makes the 3-1 an ideal protective formation when game management is the priority. This conservative setup is used if you have already qualified for the next round and even with an equal game you’ll qualify then you avoid taking risks and sustain your current position.
Rotating Four (4-0)
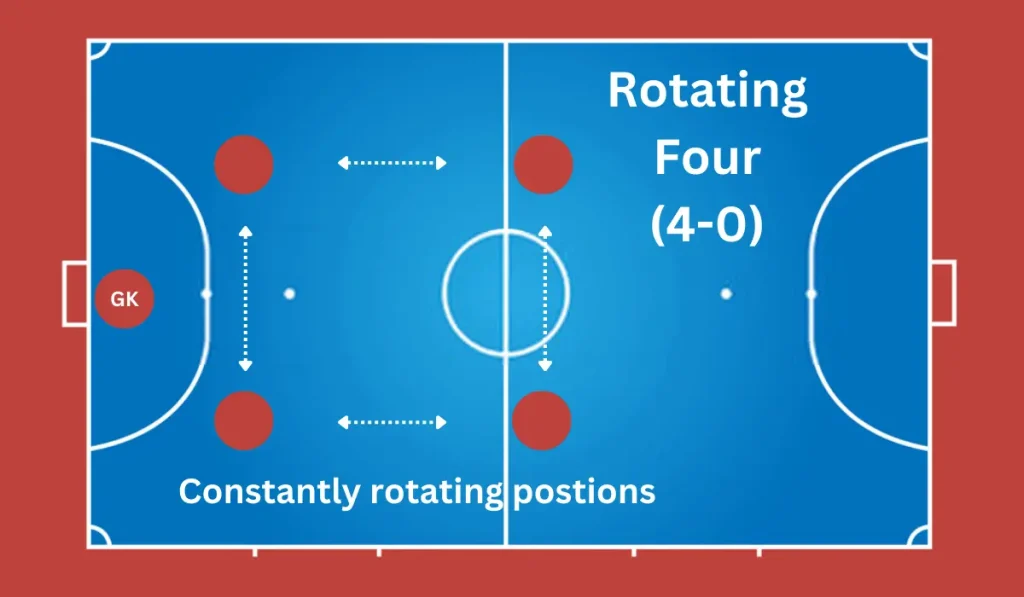
The free-flowing 4-0 system is built around complete fluidity rather than defined positions. It uses constant interchanging of roles and rotations to unsettle defenses. With no fixed attacking or midfield assignments, all four outfield players defend and attack interchangeably.
This coordinated movement is difficult for opponents to track. The rotating shape opens up multiple passing options for teammates with smart off-the-ball runs. However, the 4-0 demands intelligent, quick-thinking players with strong chemistry. They must grasp and fill spaces rapidly.
The endless physical and mental exertion can lead to exhaustive errors. It’s easy to lose shape without clearly defined roles. Executed perfectly, though, the fluid 4-0 is a defender’s nightmare, creating unchecked runs and overloads from all areas on the defense.
Against less organized teams, its dynamism and unpredictability can be ruthlessly exploited by versatile players with shared understanding. But only with the right personnel and preparation can the seamless, shifty 4-0 formation reach its chaotic potential. This is the most unpredictable formation in futsal.
Flying Keeper (3-2)
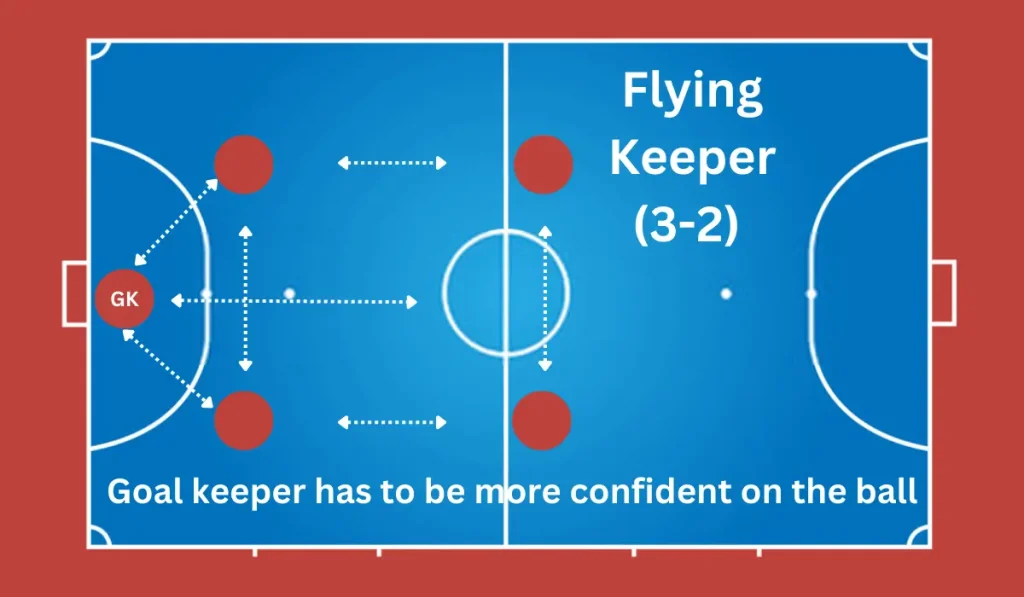
The 3-2 flying keeper is an ultra-offensive futsal formation used when chasing a game. The goalkeeper comes out as a 5th outfield player to create an overload. This tactic risks leaving the goal exposed but can unlock stubborn defenses. Timing and personnel choices are critical.
Wait too long and you may not have enough time to capitalize. Choose the wrong keeper and defensive abilities will suffer. The keeper must be comfortable and confident on the futsal ball having recommended size and distributing in tight spaces. Defenders left isolated must contain 1v1.
Attackers make angled runs to create space. Frequent shot attempts are essential before the keeper returns to goal. Success requires catching the opposition off guard and quickly capitalizing on the extra man advantage.
Use this high-risk gambit selectively when you need a goal and need to qualify or even win the game when both teams are on equal terms but be ready to make defensive adjustments if it backfires. This formation needs sheer confidence from the whole team and remaining calm and collected.
Executing Any Futsal Formation Effectively
Implementing an effective futsal formation requires much more than just positioning players on paper. It’s brought to life through communication, understanding, discipline, and adaptability. Players must be in constant dialogue, calling out markings and organization.
Everyone needs to understand both their roles and how they interconnect with teammates’ movements in a fluid system. Maintaining shape and structure demands focus and defensive commitment. At the same time, a degree of flexibility is required to adjust if the opposition gains an advantage.
The formation must complement your squad’s strengths, weaknesses, and tactical approach. Playmakers thrive in creative freedom while some defenders need clear guidelines. Analyze upcoming opponents to select shapes that counter their strengths.
Be willing to adapt the system if a particular game state calls for more offense or defense. Monitor fatigue and substitute appropriately to maintain the work rate of every player on the field.
Mastering a formation is earned through practice repetition to ingrain positioning and automatized reactions. Players should embrace positions best suited to their abilities, not personal preference.
With the right preparation, your chosen shape transitions seamlessly from theory into a dynamic, coordinated framework tailored to achieve your match objectives.
Choosing the Right Futsal Formation
There is no universally superior futsal formation. The best shape depends on the attributes of your players compared to each opponent. Analyze upcoming teams to identify threats to counteract. For example, deploy an extra defender against teams with dangerous strikers. Play directly against pressing sides to bypass their pressure.
Additionally, match situations guide formations. If chasing a game, shift to more attackers. Protecting a lead calls for greater security. Always balance defensive stability with attacking potency based on the score.
Be willing to change roles or introduce new shapes to exploit weaknesses or enhance strengths. Experiment in training to expand tactical flexibility. The most effective coaches have a collection of formations in their locker to adjust their side’s approach according to the needs of the hour.
Conclusion of Formations in Futsal
Implementing the optimal futsal formation is about more than neatly placing top futsal players into positional boxes. Real art is bringing rigid structures to life by infusing adaptability, unpredictability, and a fluidity of roles.
The perfect system strikes an ideal balance of defensive solidity and attacking potency. It accentuates your squad’s strengths while minimizing weaknesses. Roles cater to your playmakers’ abilities and preferred spaces while accounting for injuries or suspensions.
Avoid over-reliance on a single default formation. The best coaches have several shapes to change their approach when needed. Experiment with new systems in training to expand tactical fluidity.
Mastering a formation requires drilling repetitive patterns to ingrain positioning in futsal. But don’t be rigidly bound to assigned spaces on paper. Empower players to express themselves within the framework through intelligent rotations, interchanging of roles, and creative license in the final third.
For all the focus on shape, formations are lifeless without the human elements of communication, chemistry, and work ethic. Foster an environment where players feel trusted with responsibility in their designated roles. Establish a culture of organization, discipline, and collective responsibility.
There is no universally superior futsal or indoor soccer system. Each shape carries inherent trade-offs and vulnerabilities requiring specific preparations. Your chosen formation sets the stage, but the real magic happens when players bring it to life through their energy, dynamism, and synergy.
